Monthly Archives: May 2019

More series, Intimate Spaces – Beach Series

Go! Number 11 in the Intimate Spaces – Beach Series. Acrylic on canvas, 16 x 16. Kit Miracle

I completed the twelfth painting in my Intimate Spaces series this week.  My thoughts behind painting this series of beach paintings is that when people go to the beach, they carve out their little spaces, arrange their belongings, and then seem to act as if they are invisible within their own little territories.  They’re not.

Maybe I’m just a voyeur, or just have an artist’s eye for observing, but I have always been drawn to people-watching.  The beach, of course, is a great place to be an observer of the human animal, but there are many other places to do that, too.  More thoughts for future series.

Many artists have created series of paintings around themes in the past century and a half.  Most notably are Monet and his haystack paintings or Van Gogh and his sunflowers.  Some artists work the same theme for their entire lives like still life painter Gorgio Morandi who essentially painted the same objects over and over.

And what is the point of painting the same thing over and over? you might ask. For some artists, like Monet, it’s to study the object or scene in different lighting conditions.  For instance, he would often have several canvases at different points of completion, and then work on them when the same lighting and conditions presented themselves.  Most notably, his Rouen Cathedral series, but he was known for this throughout his life.

For me, it is the challenge to drill down into the subject. I like to paint the human figure in situ, or it’s natural, unposed state.  How do people interact when they think no one is watching them?  With each other, or with their surroundings?

My series of beach paintings, I have sixteen planned in all, does exactly that.  Children, families, individuals, seagulls, the landscape – all of the interactions within a limited scope of place.  If it were a different beach or place, there would be different subjects and activities.

But I am surely getting tired of painting sand and sea and sky.  Not doing the beach for the next series, for sure but I already have ideas rolling around.  First, however, will be a little plein air painting for a change of pace.

Stolen artwork

I’ll admit to a somewhat maudlin fascination of stories about stolen artwork.  The number of books and movies out about the subject indicates that other people have the same interest.  Did you see The Monuments Men about the hidden masterpieces and recovery after WWII?  Or Woman in Gold?  Both were based on true stories.  Or Priceless by Robert K. Wittman or Stealing Rembrandts by Anthony Amore?  Or The Rockwell Heist by Bruce Rubenstein?  Again, true stories.  Of course, The Goldfinch by Donna Tartt is a fictionalized account of an art theft but immensely popular.

Most of us will never encounter a circumstance of art theft.  As a director of a gallery and art center for many years, we never had an issue with stolen artwork although we weren’t displaying Rembrandts either.

However, this is a tale about a real art theft.  Or two or three.  All involving myself.

Scareboy. Watercolor on paper, 29.5 x 19.5, Kit Miracle. Stolen artwork.

The first painting I had stolen was from a public building in 1994.  I had an exhibit in the Chamber of Commerce building in downtown Indianapolis.  This was the second time that I had exhibited there. So you can imagine my surprise when I got up one morning and found a message from a Sargent somebody or other from the Indianapolis Police Department with a request to call him back about some stolen artwork. Of course, he was off duty when I called so I called the organizers of the exhibit at the Chamber.  I had a few dozen paintings there so I thought it was probably one of the smaller pieces.  To my surprise, I learned that it was the largest piece I had in the show.

Later that evening, the Sargent called me back.  After we discussed the theft – I never saw the exhibit on display since I just dropped it off at the loading dock and picked it up a month later – I asked how someone could steal such a large painting, through a revolving door no less!  Didn’t the security guard run after the thief?  The Sargent chuckled and remarked that the guard probably wasn’t running too many marathons.  (The building was open at night because the lobby held an ATM.)

The painting, Scareboy, was an amusing watercolor painting of the scarecrow that I had created out of my son’s Doctor Denton’s with a Mickey Mouse hat.  I guess someone really liked it, just not enough to pay for it.  (The Chamber did reimburse my loss.)

Set of framed vegetable paintings, originals, watercolor, pen and ink. Kit Miracle. Two of these paintings were stolen at the Broad Ripple Art Fair.

Another case of stolen artwork was at the Broad Ripple Art Fair, also in Indianapolis.  This was a very nice fair with a fence and security.  The theft occurred as a mother and her son distracted me by asking a question about a painting in the back of my booth.  When I went back into the booth, two paintings were missing.  These were small vegetable works in watercolor with pen and ink.  At the time, I was offering about forty-five different fruits and vegetables.  (And still do in my Etsy shop.)  They were very popular, all original, not prints. Apparently a partner was snatching the work while I was being distracted.  To add injury to insult, when I tried to report this to the fair officials, I was directed to the phone in the office to file a police report (this was before cellphones.)  And I later got blackballed from the fair since I had left my booth early to make the phone call. Humph!

The team working to distract the artist or booth operator is not a novel operation.  I had a couple use their dog (the guy practically pushed it into my face for me to pet) while the gal was shoving packaged cards into the pockets of her coat.  Sigh.

The interesting thing is, that artwork is such a personal thing.  People either like it or they don’t. At my level, I’m hardly a superstar in the art scene and my paintings are modestly priced.  But for famous artists, thieves often forget to think ahead about what they will actually do with the masterpieces after they steal them.  A famous painting is very hot and not easily sold on the open market.  Some are held for ransom.  Some are sold to the underworld/undercover market.  Eventually they come to surface somewhere.

But, hey, if anyone out there sees my Scareboy, just know that he belongs at home.

Studio lighting options

In over thirty years of working as an artist, I’ve tried many different types of lighting. While none is perfect, I thought I’d review what I’ve been working with lately.

Daylight from north window. Pretty even cool light, but, of course, not good for working at night.

First is just plain north light through the window.  This is often considered the gold standard for artists.  It is a cool and pretty consistent light.  My studio, the summer kitchen building of this old house, has four windows in the main part of the studio.  Only one window is on the north side, two on the east, and one south facing.  Using natural lighting is great but not always practical, especially if you want to work in the evenings or at night.  But it has come in handy on occasion during power outages.  If you’re working in a centuries-old medium, you can just carry on without electricity.

Fluorescent lighting fixture with a cool bulb and a daylight bulb for balance. Great for a broad work space such as framing and matting.

I am unusual in that I actually like fluorescent lighting (most people don’t).  I think it provides good light and is great for working, such as, cutting mats or assembling frames.  I have two standard light fixtures in my studio but have opted to pair a cool bulb with a warm (daylight) bulb.  Although this is difficult to see in the photo, it provides a nice balanced illumination for the studio.  However, if I’m working on a still life, I want aimed lighting without the overhead fluorescents.

Old can lights on a track lighting strip. These get pretty hot but are useful for studio painting displays. I’ll probably replace them in the future with smaller LED or halogen lighting.

Another lighting option in the studio are the can lights.  As you can see, they’re pretty old.  I’ll probably replace them with the smaller halogen lights in the future.  But these are really great for highlighting hanging paintings, such as when I have a studio show.

I also have several clamp-on lights (not shown) which I have used with photography tripods.  These are inexpensive and great for lighting still lifes.

A standard goose-neck clip on lamp with a daylight balanced bulb. Some flexibility but not so suitable for larger paintings, creating hot spots again.

Most of my painting in the past few years has been done with a clamp-on gooseneck lamp.  It has a daylight bulb.  Unfortunately, it sometimes causes “hot” spots on the paintings (uneven lighting).  I’ve tried placing it behind me but then I’m working in my shadow.  This is especially a problem when working on larger paintings.

Recently I investigated some new easel lighting.  First I tried the Phive LED desk lamp.  This is made especially for drawing tables and has a really wide lamp head. It also adjusts to many color temperatures and intensities.  Although it has a somewhat flexible head, I just could not get it affixed correctly to my easel.  This was not a cheap lamp so I returned it and ordered my current favorite.

The Phive LED architectural light attached to my studio. The first part of the lamp is stiff and only the top part is articulated. I could not find a way to attach it to my easel without the actual lamp getting in the way.

This was my second option for attaching the Phive lamp sideways.

As you can see, the Phive lamp has a very wide head, but because I couldn’t center it, it threw hot spots on the painting area. I thought about trying to remove the clamp and affixing the lamp to the easel with bolts, but it still wasn’t articulated enough. Also, the clamp was not easily removable.

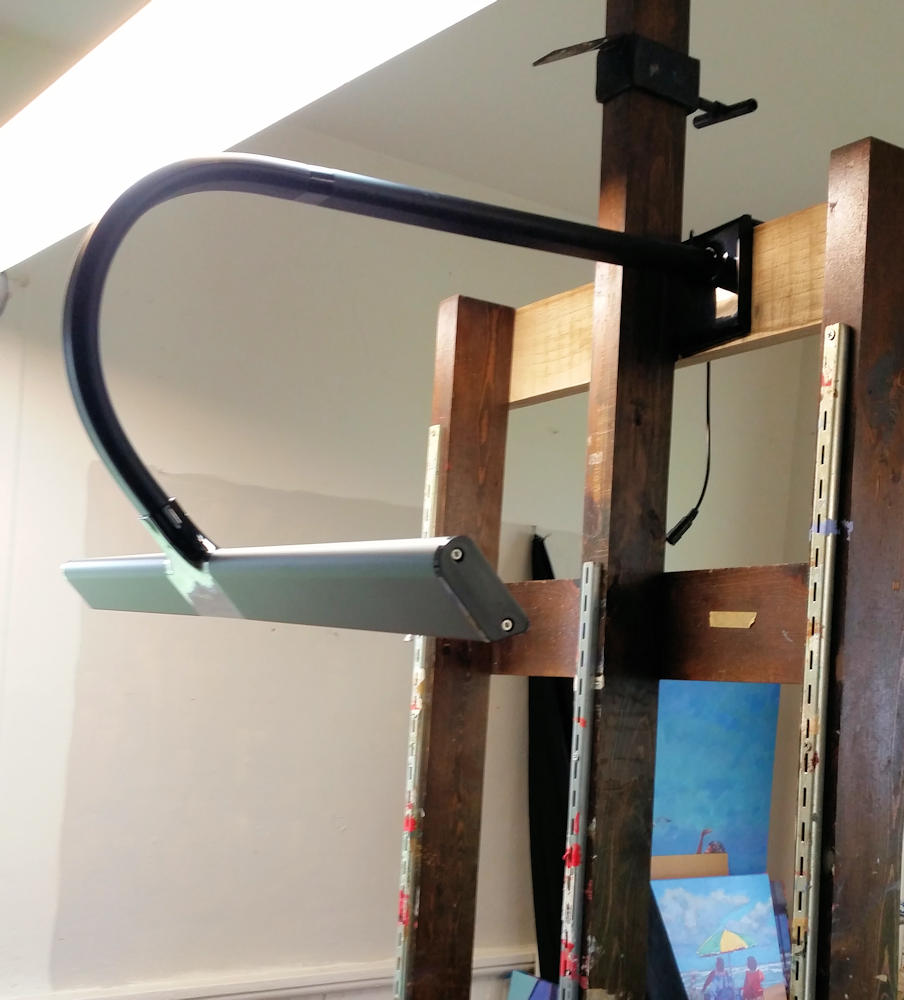
The most recent lamp that I’m using is by IMIGY with a super long and very flexible 24 inch gooseneck.  This LED lamp has several settings for cool, warm and mixed lighting with several dimming options.  It also has a delayed timer for turning it off.  The clamp is much smaller than the Phive but I may also remove it entirely and attach it directly to the easel with some two-hole plumbing clips.  However, the flexibility of the lamp means there are many options for aiming the light.  The light bar is shorter than the Phive but the output seems at least equal.

The IMIGY lamp with a 24 inch gooseneck and many lighting options. Very flexible and stays where I put it it.

It is important to have good lighting in your studio.  I discovered many years ago that if I worked under a warm light, then my paintings turned out too cool.  Now I usually use a cool light which mimics north light which means that I paint a bit warmer to compensate.  If you are unhappy with your current work space illumination, you might want to try out some of these suggestions.

The IMIGY light with cool light display.

The mixed lighting setting on the IMIGY lamp.

The warm lighting setting for the IMIGY lamp. A little too warm for painting but good to test the display.

Phive LED Desk Lamp link

IMIGY LED Desk Lamp link

Stretching canvas

The current series of paintings that I’m working on calls for some unusual sizes of canvases.  I could have ordered ready-made canvases but decided to spend some time stretching my own.  I already had plenty of rolled canvas so I just ordered stretcher bars of the sizes I needed.

Stretcher bars awaiting assembly. You need two of each size unless you’re doing a square, then you need four the same size.

Assembled stretcher bars and tools, scissors and rubber mallet.

Stretcher bars can be ordered in various widths, depths and lengths.  These are 1 ½ inch bars. The canvas that I’m using is cotton duck.  I also use linen for some of the really special pieces.  This canvas is already preprimed which I would not recommend or order in the future.  I’d prefer to gesso and prime my own canvas.

The tools for stretching canvas are pretty basic.

  • Rubber mallet
  • Scissors
  • Tape measure
  • Staple gun (electric) and staples (1/2 inch)
  • Tack hammer or framing hammer
  • Canvas pliers (not shown) I don’t usually use these, just grip the canvas and pull really hard

The bars are prenotched and will fit together with a little effort.

This is what the corner should look like after assembly.

Assemble your stretcher bars by aligning the grooves and using the rubber mallet to pound them together.  This might take a little trial and error until you get the hang of it, but don’t be afraid to put some muscle into the pounding to make the bars go together.  Of course, if you’re assembling a rectangular canvas, remember to use the two short and the two longs on opposing sides.  After you’re happy that the bars are assembled, measure diagonally from corner to corner to make sure they’re pretty square.

Measure diagonal corners to ensure the canvas is square.

Lay your assembled stretcher bars on the canvas and cut around. Leave a few inches in all sides, enough to wrap around to the back of the bars.

A roll of pre-primed cotton duck canvas. I prefer the unprimed canvas but was using this up.

Lay the assembled stretcher bars on your canvas and cut around leaving enough canvas to wrap around to the back of the frame.  This depends upon the depth of the frame you are assembling.  Then, making sure that the primed side is out, lay the assembled bars on the canvas face down. Make sure the canvas has the same border all around the bars. Starting in the middle of one bar, add a staple.  Then on the opposite side, pull the canvas really tight, making sure it’s not puckering, and add another staple. Then do the two sides.

More tools for actually stretching the canvas. Electric staple gun, 1/2 inch staples, tack hammer, tape measure.

Start in the middle of one side, put a staple in. The do the opposite side, pulling tightly. Then do each end, same thing. Then go back and add a couple of staples on either side of the first staples. Keep working around the frame, always pulling tightly. When you get to the corners, neatly fold the corners in. You don’t want a bunch of canvas on the corners as that will hinder framing.

Work your way out to the edges all the way around until you get to the corners.  The corners are a little tricky but try to wrap the canvas as neatly as you can.  Then go around the canvas and set in the staples with the tack hammer.

Drive the frame wedges into the slots in the corners. These are plastic wedges but they also come in wood and in various sizes. You will need to pound them in with the rubber mallet. They should be pretty tight and your canvas will be very tight.

The canvas will appear pretty tight but you need to tighten it even further by driving in the wedges into the corners with the rubber mallet.  Align the straight edge of the wedge with the corner frame as pictured.  Then put in the other one going the opposite direction.  This will really tighten the canvas.  If it should loosen over time, you can readjust the wedges or even re-stretch the canvas.  As you can see here, I am using plastic wedges but they also come in wood.  You will need eight pairs per frame.

If you have never tried stretching your own canvas, I urge you to give it a try.  It seems a little complicated at first, but you will end up with a better product and save some money in the long run.