Category Archives: recipe

Biscotti for Santa

Biscotti for Santa

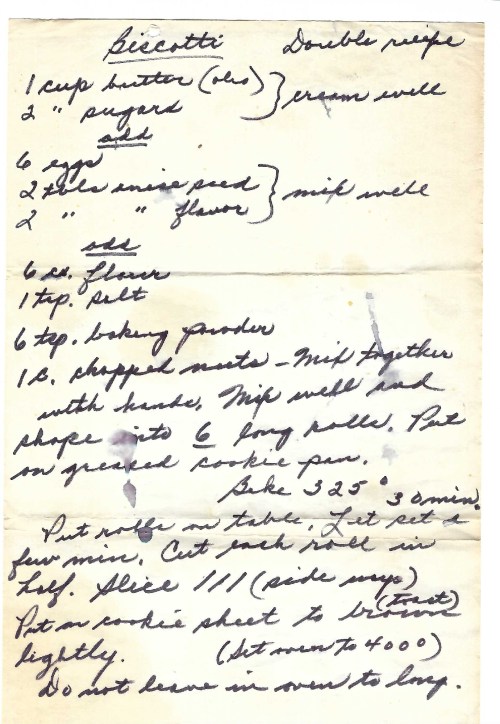
Making cookies seems to be a holiday tradition for most households this time of year.  We’re no exception.  My husband channels his Italian roots and tackles making a variety of biscotti based on his mother’s hand-written recipe.  Although she focused on the traditional anise seed and toasted almond cookies, he has expanded the variety that comes out of our kitchen enormously. This includes a variety of nuts, flavors, and dried fruit.  Coffee and chocolate, anyone?  Yumm.

In past years, he would begin making biscotti weeks in advance.  They’re such a dry cookie that they seem to keep forever, that is, if we don’t eat them.  However, we’ve had to cut back our production, primarily due to the increase in cost of ingredients, and especially the higher cost of shipping to our friends and relatives.  So we thought that we’d share the recipe, a little updated, but anyone can follow this.  Just allow some time.

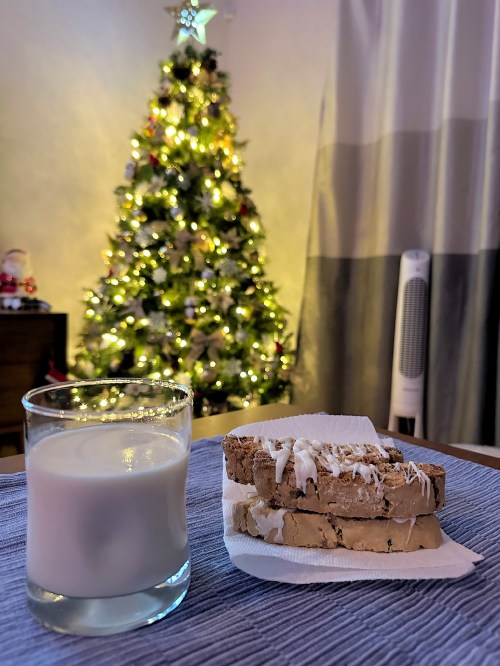
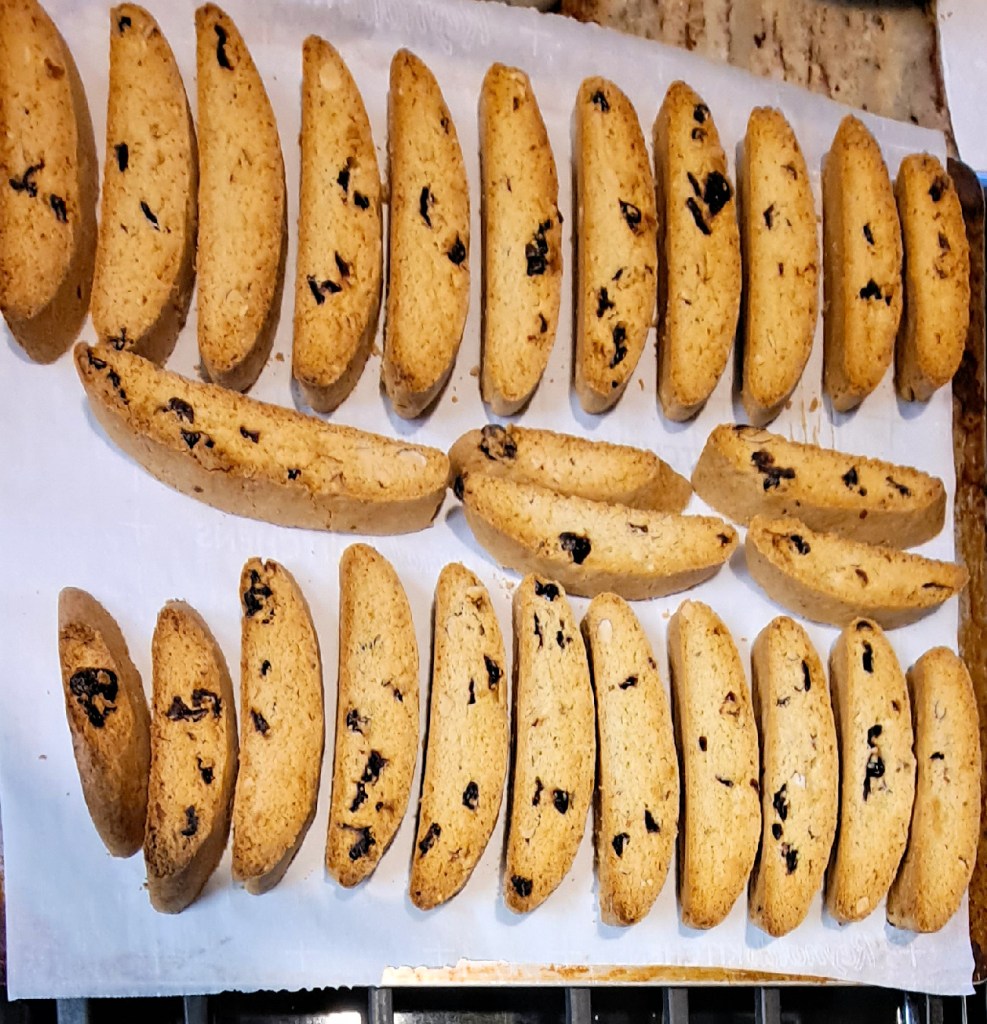
We use all real butter and eggs, real nuts, dried fruit, chocolate, anise seed and vanilla.  The recipe shown here is toasted almonds and Craisins, with white almond bark icing. 

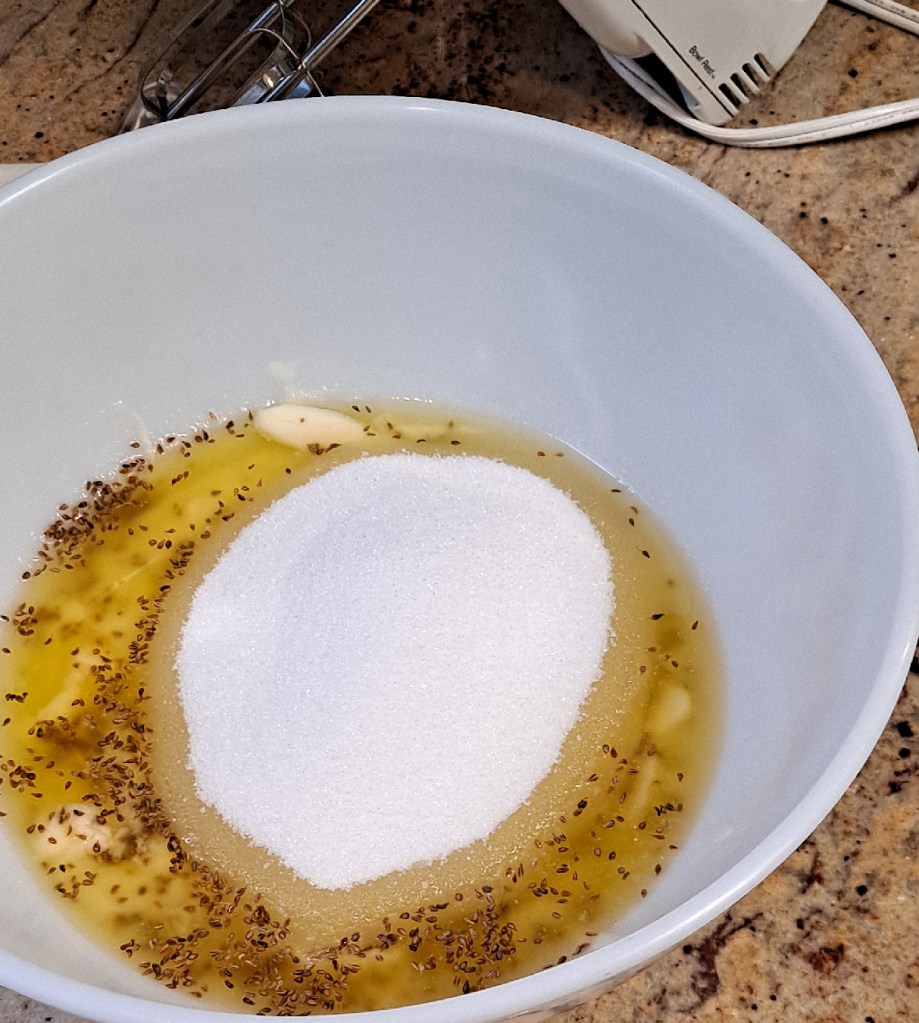
In a large mixing bowl, cream the following

  • 1 cup butter, softened
  • 2 cups sugar
  • 6 eggs
  • Add 2 tbsp anise seed
  • 2 tbsp anise flavoring but my husband uses vanilla instead

Set aside for a moment.  In a smaller bowl, mix the dry ingredients together, sift

  • 6 cups flour
  • 1 tsp salt
  • 6 tsp baking powder (that would be 2 tablespoons)

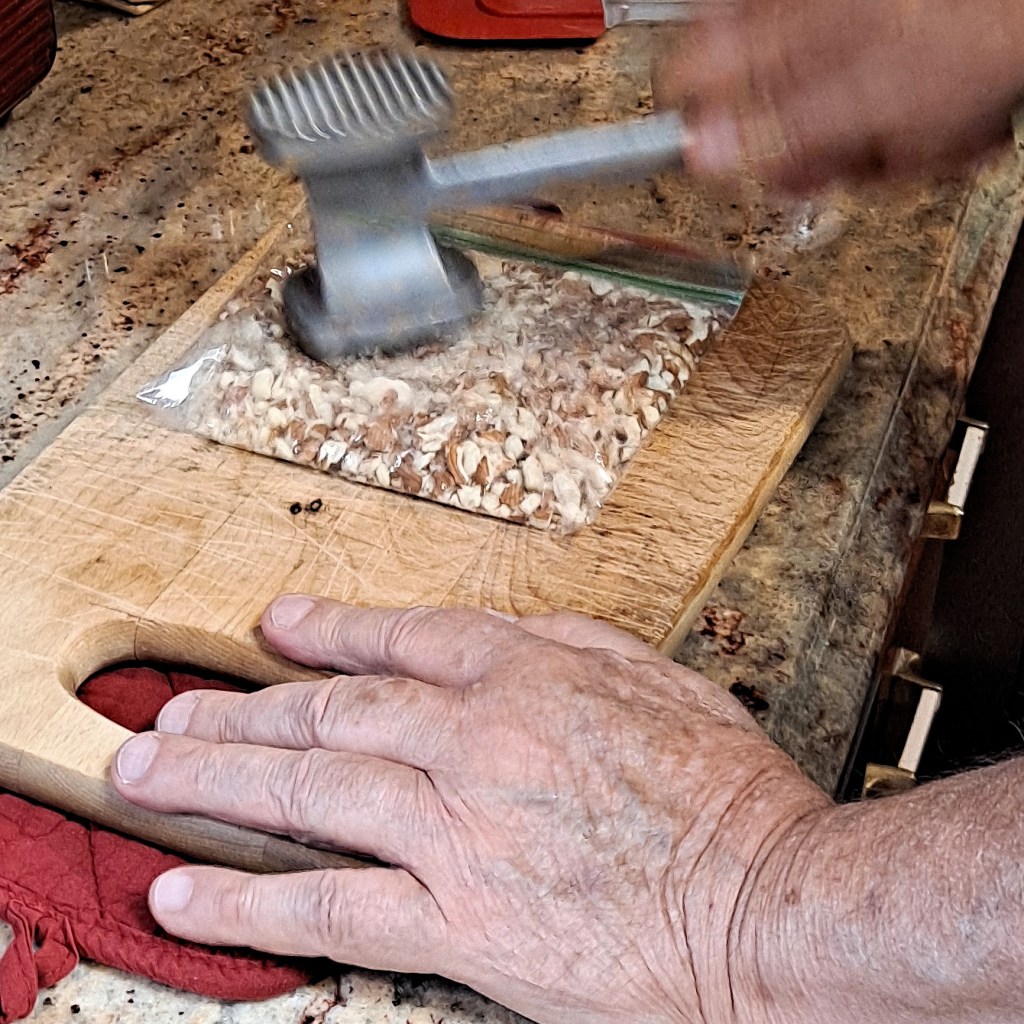
Have 1 cup almonds toasted and broken up or whatever other nuts you intend to use, ready to add.

About 1 cup of dried fruit (Craisins, dried cherries), or mini chocolate chips, etc.  Maybe some orange or lemon zest, finely ground coffee, etc.  Just don’t add so much that the dough becomes too moist or heavy.  You want a dry dough.

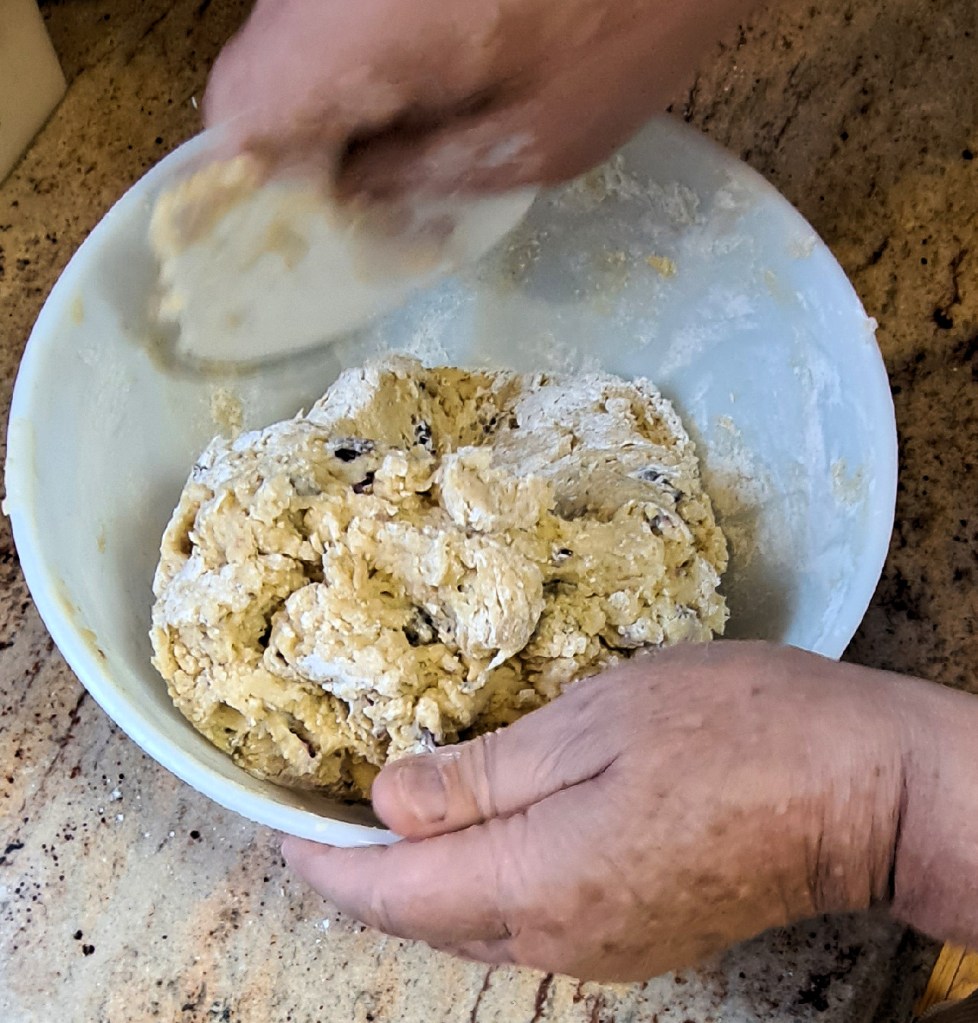
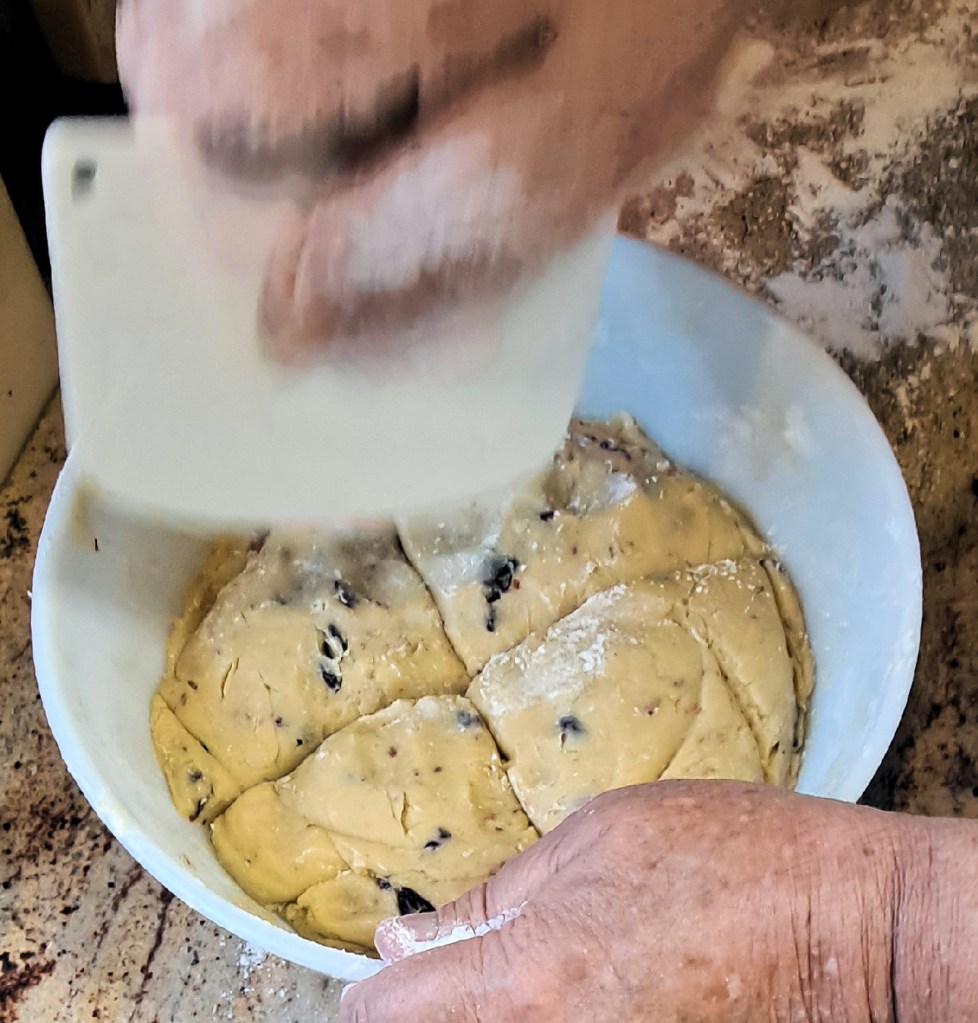
Then begin to add the dry ingredients to the wet ingredients, about a third at a time.  His favorite tool is the plastic bowl scraper.  You can add the nuts and fruit about half way.  Keep adding all the dry ingredients.  It will be a pretty stiff dough but don’t add any more liquid. 

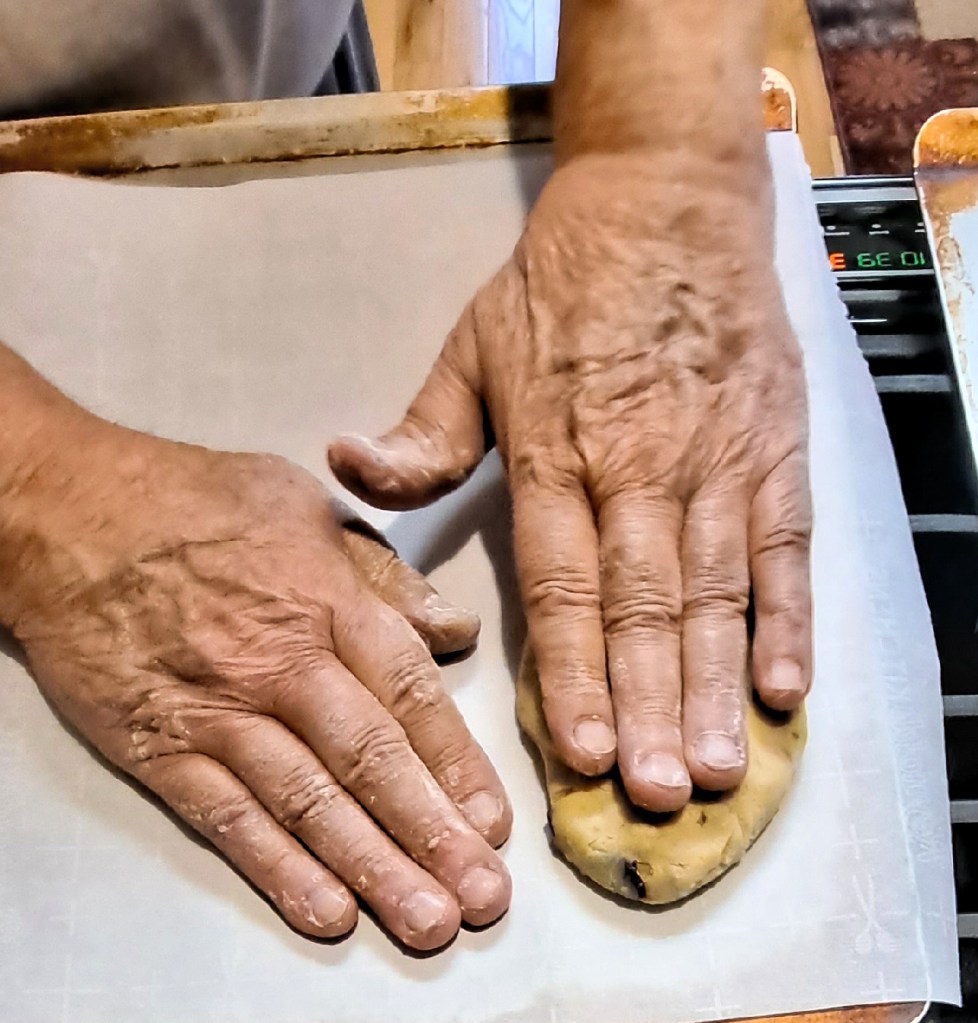
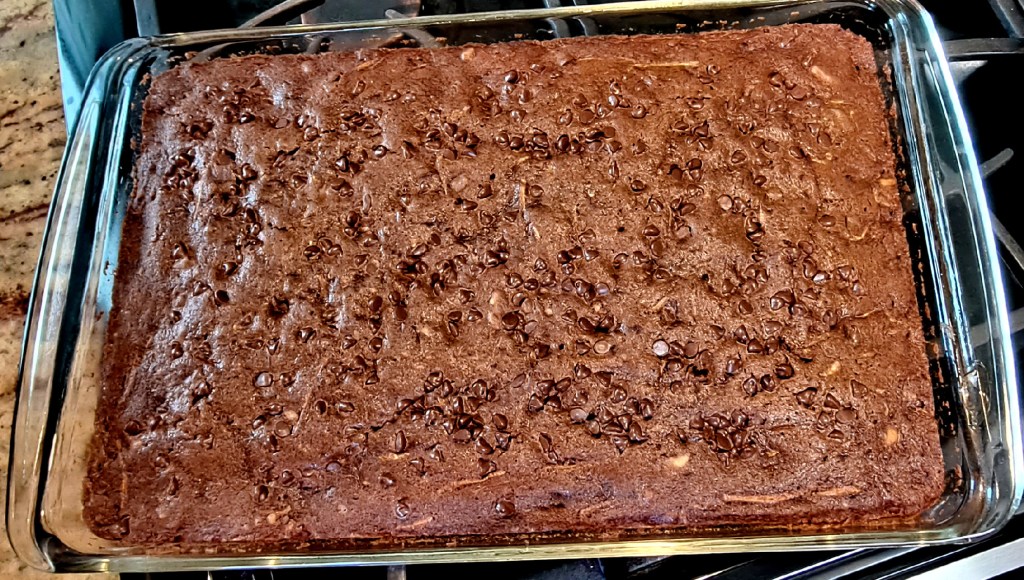
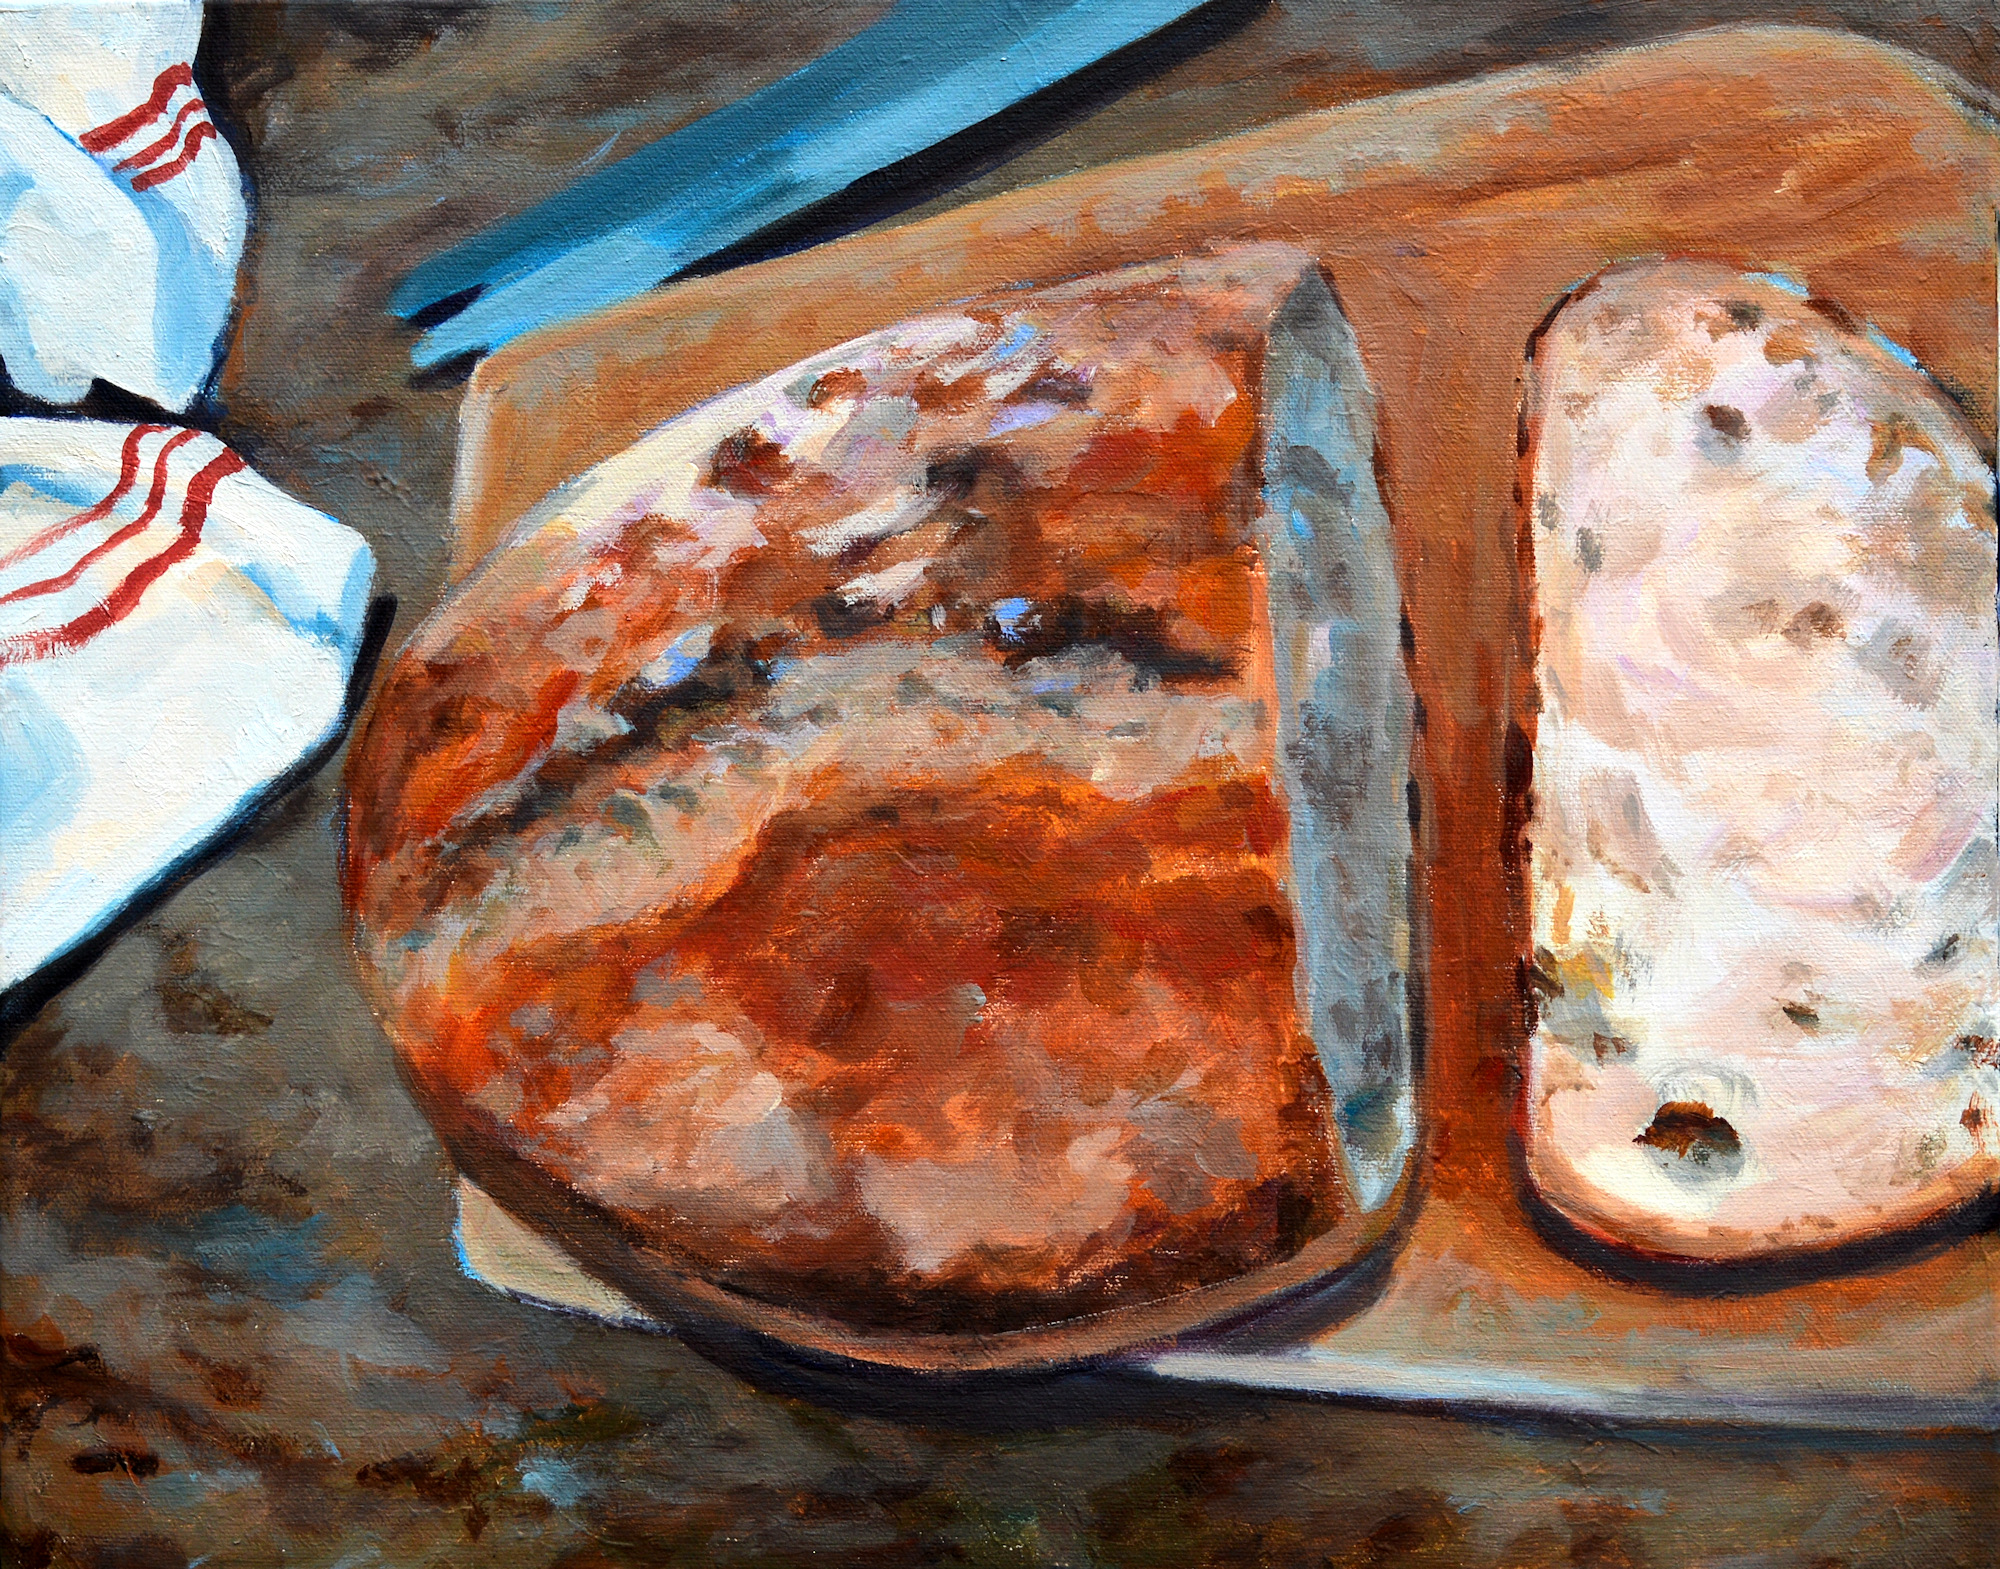
Divide the dough into four sections then place on cookie sheets covered with parchment paper.  Shape into rolls and flatten.  (See photo.)  They’ll end up about 10 inches long and 4 or 5 inches wide. They will raise in the oven.

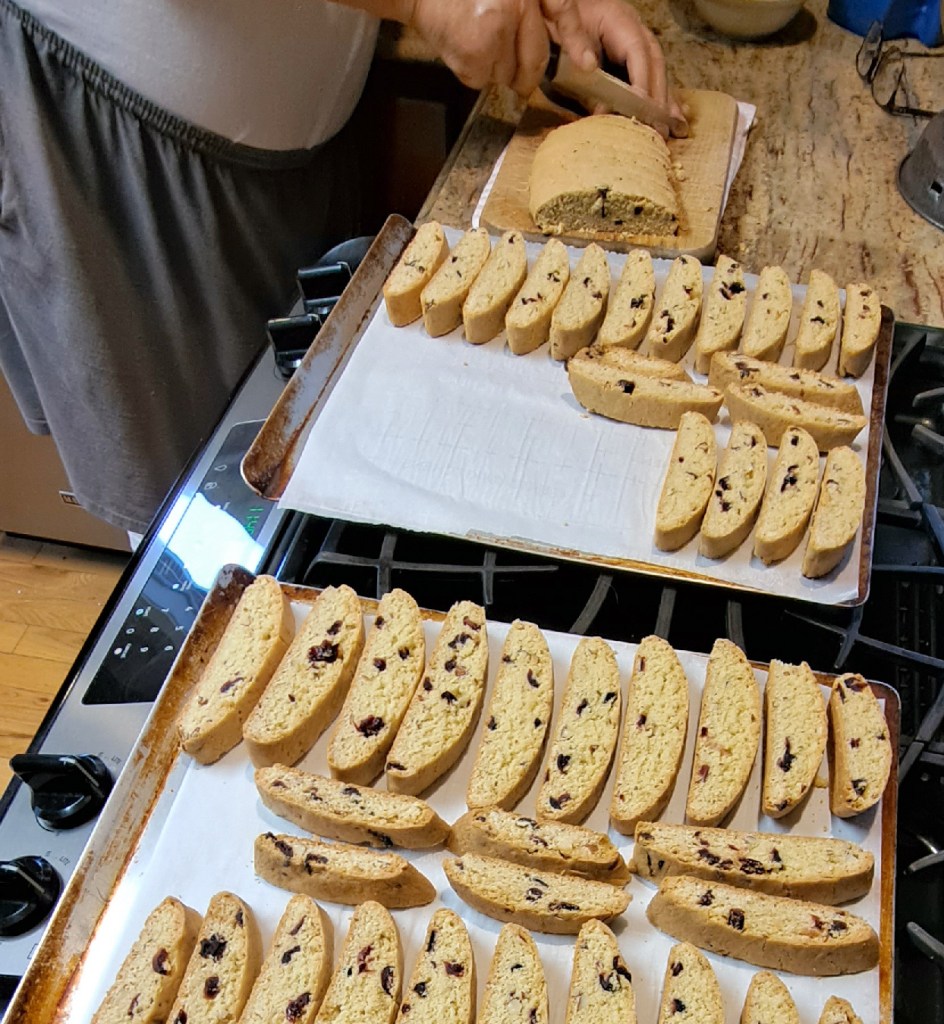
Bake at 325 for 15 minutes, reverse pans and cook until lightly brown.  They’ll be a little bit soft but not much.  After they cool on the pans until you can handle them, slice about ¾ inch wide in diagonals (see photo).  Then bake for another 20 minutes to toast or until done.

Bring them out and let them cool on the pan.

When they are cool, then prepare the icing.  I like white or chocolate almond bark, melted and drizzled over the cookies.  Sometimes both.  Sometimes dipped one end in chocolate.  Sometimes make a powder sugar/lemon juice icing. 

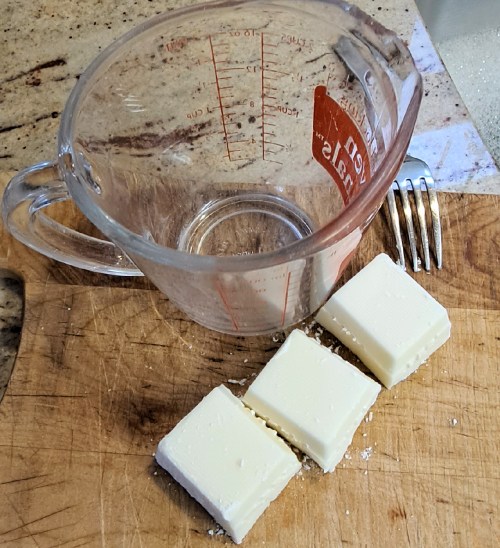
You will need four squares of white almond bark in a 2 cup Pyrex measuring cup.  Melt in the microwave about 1 minute and 20 seconds on medium.  Pull out, start breaking up the lumps with a fork and stirring around.  The heat from the cup melts the icing.  Put back in the microwave about another minute.  Then pull out and stir rapidly to continue melting the almond bark. 

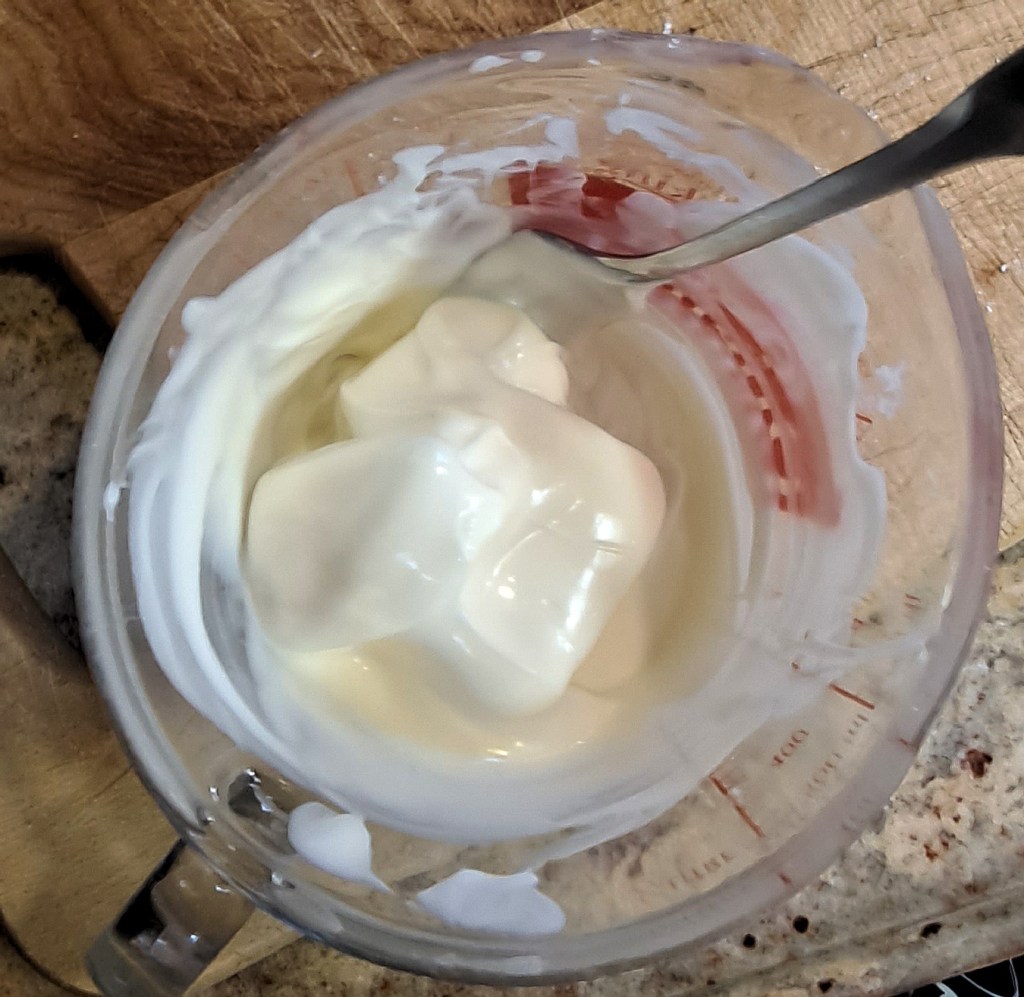
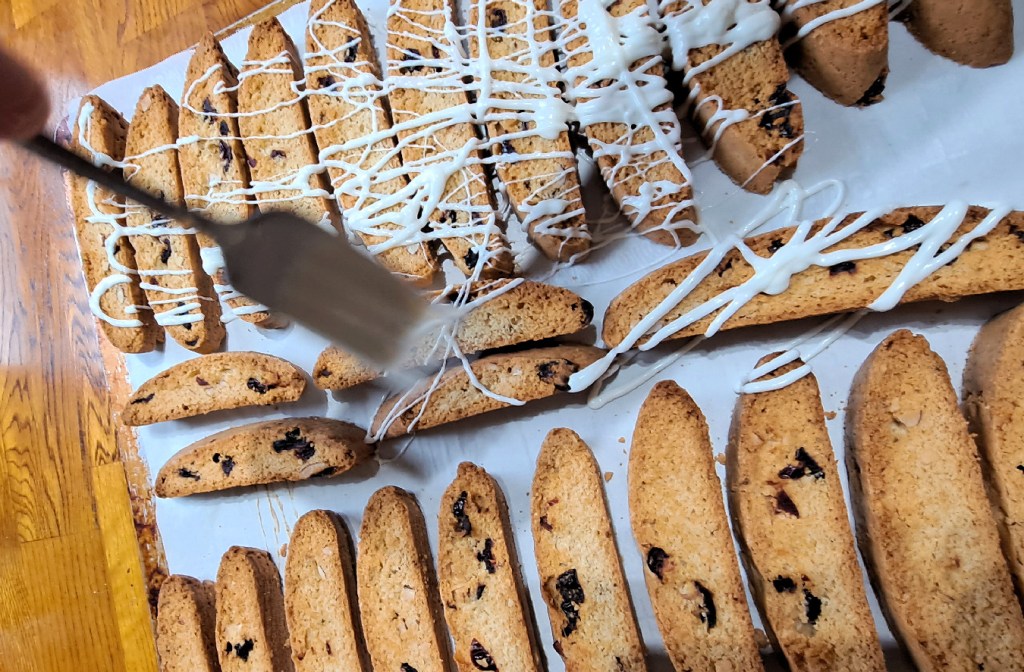
Here you have to be very quick to drizzle the icing over the cookies from the tines of the fork.  You can add a contrasting layer of icing (say dark chocolate) in a different direction.  DO NOT ADD ANY LIQUID TO THE MELTED ALMOND BARK.  It will create a mess.  DO NOT OVERCOOK THE ALMOND BARK.  It will burn. 

When the cookies have totally cooled, store them in a lidded container.  They should last for a long time but we don’t really know.  They’re usually all gone before they have a chance to get stale. 

Some of my favorite combinations of flavors are:

  • Traditional, anise seed and toasted almond
  • Craisins and almonds
  • Dried cherries and walnuts
  • Mini chocolate chips and coffee (grounds, tbsp)
  • Lemon and toasted almond
  • Chocolate chips and orange rind

Use your imagination.  Please send photos if you decide to make this recipe.  Santa will be very happy.

The original hand-written recipe

PS, my husband says that if they don’t turn out exactly right, get back with us and he’ll try to help you fix it.

Chocolate zucchini brownies

Chocolate zucchini brownie and butter pecan ice cream. Yumm!

The joke here in Indiana is that you lock your car doors in the summer so that you don’t return to find it filled with bags of zucchini from your friendly neighbors.  Ha ha. 

That is only partially a joke because the vegetable is so prolific and easy to grow.  When it starts coming in, you will be searching for ways to use it.  Well, I have several delicious ways to use zucchini and I’m going to share with you one of my favorites.

This recipe is from one of those hometown cookbooks which and was compiled by the Parishioners and Friends of Saint Sebastian Church in Belle Vernon, PA.  My mother-in-law gave me this book years ago.  I cherish it for all the homecooked recipies featuring recipies from the area.  It joins a couple of other favorite regional cookbooks on my shelf.

I promise you that this is one of the most delicious brownie recipes (of any kind) but suggest that you don’t tell anyone that it has zucchini in it until after they’ve eaten it. The brownies are very moist and this is a sneaky way to get your kids to eat their vegetables.  The zucchini has no flavor actually but adds some body, similar to coconut.

Chocolate Zucchini Brownies

½ cup butter (1 stick), softened

½ cup oil

1 ¾ cup sugar

2 whole eggs

1 tsp vanilla

¼ cup chocolate chips, chopped (or use mini chips), and I’m pretty generous with these

2 cups grated zucchini, plus ½ cup more chocolate chips

½ cup sour milk (add 1 tablespoon vinegar to ½ cup milk)

2 ½ cup sifted flour

4 Tbsp cocoa

½ tsp baking powder

1 tsp baking soda

½ tsp cinnamon

½ tsp ground cloves

½ cups chopped nuts (walnuts or pecans)

Cream the butter, oil and sugar until it’s about the consistency of butter-cream frosting.

Add the eggs, vanilla, and sour milk.  Beat until mixed well. 

Mix the dry ingredients together, then gradually add to the mixture as you are beating it.

Stir in the grated zucchini, mini chocolate chips, and nuts until well mixed.

Spoon the batter into a 9 x 13 greased pan.  Sprinkle the top with the remaining chocolate chips.

Bake at 325 for 40 to 45 minutes.

These are so delicious, moist and light.  You can use a box grater or food processor to grate the zucchini.  I peel the vegetable but it isn’t necessary.  The variety of zucchini is Grey Zucchini by Ferry-Morse which only grows about seven inches.

Smallish zucchini, about six to eight inches long. Peel and cut into strips, taking out any seeds before grating.

While I’m grating zucchini, I grate a lot more to freeze in two-cup portions, just right for these brownies.

They also make tasty fritters, zucchini pineapple bread, muffins, layered in vegetable lasagna, soups and stews.  Don’t worry, you’ll find plenty of uses for this easy-to-grow veggie.

Bread, a new painting

Bread, acrylic on canvas, 16 x 20. The Food We Eat Series. Kit Miracle This series is all about food. We’re all a little bit obsessed, I think. But what is better than fresh made bread, still warm from the oven? Ah, the aroma. The crunch of the crust when it is cut.

Who doesn’t love the aroma of fresh bread?  The crunch of the crust and soft texture of the body?

This week as I was waiting for more canvases to be delivered for my latest series, I spent some time doing some smaller paintings.  This is another painting for The Food We Eat series.  I guess since we’re all isolated at present, my thoughts return to food.  Must be an animal thing.

My husband makes this lovely, crusty bread.  I’ve posted the recipe in a previous post.  It is very easy and so so delicious.  It makes great toast and bruschettas. I think he’s making French toast for breakfast this morning with the last of this loaf.  https://my90acres.com/2018/03/28/crusty-artisan-bread/

Bread, detail. It is often difficult to convey in the pictures that I post the brushwork and the texture of the paint. Just click on the picture and expand it to see. You will notice that I actually use very loose brush strokes for much of the painting. Again, as mentioned in my last post, the viewer’s eye fills in many details.

As I was waiting for a frame to arrive for a painting which needed to be delivered this week, I painted this and three other smaller pieces.  One plein air and two landscapes.  The frame never arrived, due to delays at the factory due to COVID.  So I had a good friend make a frame but that’s a story for another day.

Anyway, if you’re not doing anything today and you’d like to surprise your family, or just yourself, try your hand at some homemade bread.  You won’t be sorry.

Thick Kale Soup with Smoked Sausage

Thick Kale Soup served with crusty multi-grain bread. Great any time of year.

We often think of soup as being a cold weather food but actually soup is great any time of year.  You can just go “shopping” in your fridge or garden and come up with a variety of tasty and healthy options.  After my recent post of my Corn Chowder recipe, I had a request for the Kale soup recipe.  So here goes.

This soup has been a family favorite for years and we’re likely to make it any time of year.  It is often a little thicker than soup (stewp?) but it is hardy any way you make it.

Ingredients:

·         3 tablespoons olive oil ·         1 large bunch of kale, deveined, chopped
·         1 pound smoked sausage, cut up ·         2 quarts chicken broth
·         1 large onion, chopped ·         2 cans white beans (northern, cannelloni )
·         4-8 cloves of garlic,diced ·         Cracked pepper
·         4 large potatoes, cubed ·         Salt to taste


Heat the olive oil in a 6 – 8 quart soup pot.  Add the chopped smoked sausage.  You can use any kind of smoked sausage – regular, light, turkey, or even Polish kielbasa. Stir and brown.

Add the chopped onion and stir until clear.  Add the minced garlic.  Keep stirring so they don’t burn.

Kale soup – Step 1. Brown the cut up sausage, add the onions and garlic.

Meanwhile, wash and strip the tough veins out of the kale.  Rough chop and add to the mixture, stirring until wilted.  Add the chicken broth and cover. Bring to simmer.

Step 2. Add the chopped kale and wilt in pan.

Wash and dice the potatoes.  Sometimes I leave the peel on just for added texture. Add to the pot after it comes to a slow boil.  Cover and bring back to simmer.

Step 3. Add the chicken broth, bring to simmer. Add the cubed potatoes and cover. Cook for 20 minutes.

When the potatoes are cooked (about 15-20 minutes), use an old fashioned potato masher and rough mash them in the pot.  This just helps the soup to thicken.

Then add the two cans of beans (drained).  Frankly, I just use whatever white beans I have available.  I’ve even added butter beans and it works fine.

Add the cracked pepper to taste.  You probably won’t need any salt as the sausage is pretty salty, but suit yourself.

Serve with crusty bread for a filling lunch or dinner.

Corn chowder

Sweet corn, bi-color. Peaches and cream variety.

It’s that time of year for those of us who grow gardens.  The produce is coming in and we have to scurry like squirrels to put it all away.  Fresh green beans and new potatoes.  Juicy sliced tomatoes or sweet cherry tomatoes popping in your mouth.  With the vagaries of the weather this summer – buckets of rain in June and the beginnings of a drought now – I feel lucky to be able to pluck anything at all from the garden.  But we always say that.  Some years it’s too many zucchinis.  This year, none.  I even had to replant the green beans. We can never quite predict what the bounty will be.

With all of these fresh veggies, we’re making soups -vegetable, minestrone, and fresh tomato.  Sometimes Thick Kale soup with smoked sausage. But this morning I picked the first batch of sweet corn.  I think this variety is peaches and cream and it’s so so good.  We’ll put most in the freezer but I made a triple batch of one of our favorite soups, Corn Chowder. I thought I’d share this family favorite recipe with you.  You can use canned corn but fresh is better.

Ingredients

·         ½ pound bacon cut up fine ·         2 cups milk
·         1 small onion, cut fine ·         3 tablespoons cornstarch
·         1 – 2 potatoes, cubed ·         1 ½ teaspoons salt
·         1 cup water or chicken broth (or both) ·         ¼ teaspoon fresh grated black pepper
·         1 ½ cups corn cut fresh off the cob (or canned) ·         Couple of dashes of garlic powder

In a large soup pot (6 -8 quarts or larger if you increase the recipe), saute bacon until soft and half cooked.  Drain the fat. Add chopped onion and stir. Cook until soft.  Add cubed potatoes and stir.  Partially cook (about 5 minutes).  Add water or broth, corn, spices and bring to low boil. Stir in milk.  Bring back to simmer.  Make a slurry of the cornstarch (mix it with a little water), then slowly pour in while stirring.  This will thicken the soup.  Simmer until potatoes are done, adding additional milk or broth to thin. Serves 6 -8.

That’s pretty much it.  You will want to double or triple this recipe because it is sooooo good.  Serve with fresh hearty bread or cornbread.

Mangia!

Baby it’s cold outside. Let’s make soup!

Homemade beef vegetable soup and homemade bread slathered with butter. Perfect meal for a chilly day.

A nasty weather front barreled down on us yesterday.  Rain for several hours.  Then a drastic drop in temperatures, the winds picked up and came at us from the northeast, and all that rain turned to ice and snow.  What to do?

Let’s make soup!

It should be no great secret that in this house with two cooks, we make a lot of soup.  It was my turn today and I decided to make a hearty beef vegetable soup.  There is a big difference between soups and stews.  Stews are thicker with larger pieces and fewer vegetable varieties.  Minestrone soup is a whole different thing; usually two kinds of meats, different vegetables, and cooked in a different manner.

Today’s beef vegetable soup started with a shopping trip to the freezer,  We plant a large garden and put up a quantity of vegetables.  This trip netted diced tomatoes, green beans, ground beef and homemade beef broth.

Shopping basket from the freezer. Ground beef, homemade beef broth, diced tomatoes, green beans.

Homemade vegetable soup can have many varieties and even mine are not exactly the same each time.; it depends upon what I have on hand. I usually chop the vegetables pretty small so they are similar in size and will cook the same.  I used a six quart pot but we often use a very large soup pot, 10 -12 quarts. This is what I put in today’s special.

  • Ground beef, 1 ½ pounds
  • Chopped onion
  • Chopped carrots (five)
  • Beef broth
  • Diced tomatoes
  • Green beans
  • A couple handfuls each of quinoa, lentils, and orzo pasta. I would have used alphabet pasta but was out.  Any kind of tiny pasta or even broken spaghetti or noodles will work.
  • Corn, one can
  • Potatoes, three
  • Finely chopped kale (I was out of cabbage)
  • Spices and seasonings – salt, coarse ground pepper, garlic powder, beef cubes

Step 1:  Brown the beef in a couple of tablespoons of oil, breaking it up as you go.  Then drain any fat off.

Step 1:  Add the chopped onions and carrots.  Carrots take a long time to cook so they get added near the beginning.  Stir until softened.

Step two. (Step one is just browning the beef in a couple of tablespoons of oil. Drain any fat off after the beef is cooked.) Carrots and onions are added at the beginning as they take longer to cook.

Step 3:  Add the beef broth and beef cubes.  Add diced tomatoes, bring to simmer.

Step 4:  Add a few handfuls of lentils, quinoa, and tiny pasta.  Don’t use larger beans unless they’re canned or pre-cooked.  They won’t cook in time and no one likes crunchy beans.

Step 5:  Simmer and stir.

Step 6:  Add green beans and corn.  Cabbage or in this case, kale.  Bring back to simmer.

Step three. After the diced tomatoes and handsful of dried goods (lentils, quinoa, tiny pasta) have come to a boil and simmered, then add the chopped green beans, corn and finally the potatoes. Let it all simmer until done.

Step 7:  Add chopped potatoes and then let simmer until all the vegetables are done.

Serve with some homemade bread.  Yummm!

Beef vegetable soup, final. It is thick but not thickened like stew. Very hearty!

This freezes well but I don’t think we’ll have much left over.  And I’ll have to keep my husband from giving it all away as he is apt to do. He’s a very generous person.

We’re hunkered down and holding our own against the storm.

What’s on your menu these days?

Chicken and Dumplings – Comfort Food Recipe

Chicken and dumplings, comfort food for the soul and body.

The weather has drastically changed from last week’s sunny and balmy temperatures in the 60s, to this week’s freezing rain, drizzle and even a few flakes.  Time for some comfort food.

When I have asked my sons, both now grown, what their favorite childhood food was, they both say that it was my chicken and dumplings.  My brother and I both agreed that it was the most requested meal we would request of our grandmother, too.  Some things never change.

So I made a big pot of chicken and dumplings this week.  Now if you even have one toe in the South, you know that by dumplings, I do not mean those fluffy dumplings.  Those are for beef stew.  The kind of dumplings I’m talking about are “slick” dumplings, or flat dumplings. These are akin to a homemade noodles.

So what follows is my grandmother’s recipe as taught to me; nothing is written down.

In a large pot, at least eight quarts, place:

  • Three chicken thigh and leg quarters (or equivalent). Dark meat is more flavorful.
  • A whole, unpeeled yellow onion (the skin adds a nice color to the broth)
  • Water about half way (no exact measurement)

Bring to a boil and simmer for about an hour and a half until the meat is falling off the bone.

Drain through a colander into another pot and place pot of broth back onto the stove.  Add about two teaspoons of salt, a few shakes of garlic powder, some coarse ground black pepper, a pinch or two of parsley flakes.  I usually add a couple of chicken bouillon cubes for more chickeny flavor but that is a personal choice.  Bring pot of broth back to simmer.

While the cooked chicken is in the colander, you’ll want to move it around with a large spoon to let it cool.  Then debone the chicken.  You’ll end up with a large plateful of chicken.  Cut up some of the larger chunks but don’t shred it too much.

Meanwhile, as the chicken is cooking, you’ll want to make the dumplings.  Frankly, this is about the same recipe as homemade pie dough.  Ingredient measurements are not exact but you’ll get the feel of it.

  • In a medium-sized bowl, add 1 ½ to 2 cups of flour
  • Add 1 tsp of salt and mix with the flour
  • Add shortening, about the size of a hen egg, and cut in with pastry cutter or your fingers. My grandmother would sometimes use melted chicken fat.  (She never worried about cholesterol or her weight but remained thin and fit and lived into her nineties.)
  • When the shortening is cut into the flour and it looks kind of granulated or like crumbs, then you add ice water. You drizzle it in little by little and fluff it with a fork.  This will be about ¼ to 1/3 cup. It is not an exact measurement but don’t add too much or your dough will get sticky which will make heavy dumplings.  Bring it into a ball but don’t handle it too much.
  • Put it in the refrigerator to rest. Cool dough is easier to roll out.
  • About 15 minutes before your chicken is done, take the dough out of the fridge and roll it very thin, about 1/8 inch. Then cut the dumplings into squares about 1 to 1 ½ inch in size.  You can use a sharp knife but I find a pizza cutter works much faster.

After you have brought the seasoned broth back to a boil, add the cut dumplings into the simmering broth, a handful at a time.  Stir a bit to keep them from clumping together but they’ll rise to the top when cooked.  Then add the deboned and cut up chicken back to the pot and again simmer.  The dumplings will usually thicken the broth but you can always use a little cornstarch and water to thicken it.  Or if you need to thin it, add some more chicken broth or water.

I know this sounds like a lot of work but it’s definitely worth it and perfect for a cold, winter day.  Let’s just see if your family adds this to the favorites list.  Enjoy!